
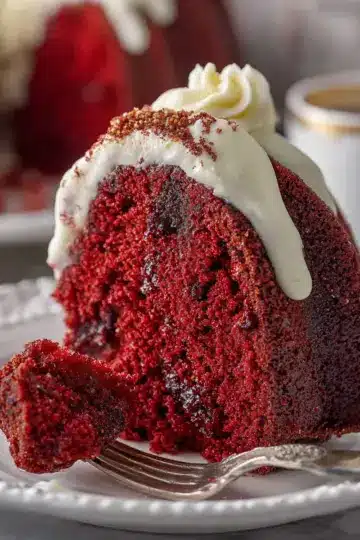
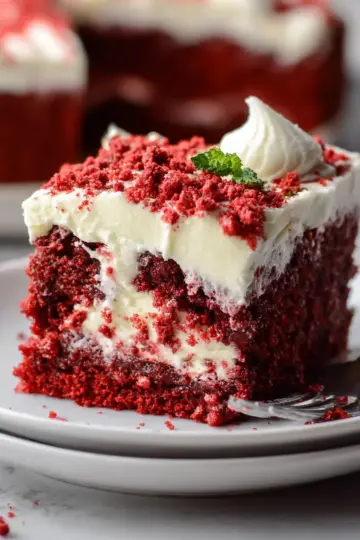
Introduction to Bloody Red Velvet Cake
If you're a young professional looking to impress your guests at the next dinner party or celebration, the bloody red velvet cake is the perfect choice. This showstopper combines the rich, velvety texture of traditional red velvet cake with a hauntingly beautiful presentation. The striking red color, reminiscent of a classic horror film, makes it an unforgettable dessert that will spark conversations and elevate any occasion.
Beyond its aesthetic appeal, the bloody red velvet cake is surprisingly easy to make. With its combination of soft layers, luscious buttercream, and a delightful “blood” ganache, even those who are new to baking can tackle this recipe with confidence. Plus, it’s a great opportunity to showcase your culinary skills and creativity to friends and colleagues in a fun, festive way.
Celebrate life’s special moments with this visually arresting cake that echoes your vibrant lifestyle. So whether it's a birthday, Halloween party, or just a cozy gathering with friends, why not whip up this masterpiece? Discover the joy of baking and make unforgettable memories with this bloody red velvet cake that dazzles the senses! For inspiration and tips on how to bake like a pro, check out this baking guide.
Ingredients for Bloody Red Velvet Cake
Creating your own Bloody Red Velvet Cake is an exciting adventure in baking. Before we dive into the mouthwatering process, let’s gather the necessary ingredients to ensure your cake is as stunning as it is delicious.
Candy "Glass" Shards
For that frightfully fun touch, you’ll need:
- 2 cups granulated sugar
- ⅔ cup light corn syrup
- ¾ cup water
- ⅛ teaspoon cream of tartar
These candy glass shards not only add an impressive visual but also a delightful crunch that contrasts beautifully with the cake's rich layers.
Red Velvet Cake
The heart of your bloody red velvet cake is made with:
- 1 ¾ cup all-purpose flour
- 2 Tablespoons natural cocoa powder
- 1 teaspoon baking powder
- ½ teaspoon baking soda
- ½ teaspoon salt
- ¾ cup unsalted butter, softened
- 1 cup granulated sugar
- 2 Tablespoons brown sugar
- 2 eggs
- ¾ cup sour cream
- 1 ½ teaspoon vanilla
- ½ teaspoon vinegar
- ½ cup buttermilk*
- 1 Tablespoon red food coloring**
These ingredients will come together to create a moist and flavorful cake that’s sure to impress.
Vanilla Swiss Meringue Buttercream
To frost and fill your cake, you’ll need a luscious buttercream made from:
- 7 large egg whites
- 2 ¼ cup granulated sugar
- ¼ teaspoon salt
- 1 ¾ cup (3 ½ sticks) unsalted butter, cold and sliced into about 20 pieces
- 1 teaspoon vanilla
This smooth frosting will complement the bloody red velvet cake perfectly!
White Chocolate "Blood" Ganache
Finish off your cake with a chilling touch using:
- 3 ounces white chocolate, chopped or chips
- ¼ cup heavy cream
- Red and black food coloring
This ganache adds richness and a dramatic flair to your creation. As you gather these ingredients, think about how these flavors will meld into an unforgettable dessert! If you're curious about more unique recipes, check out sites like Epicurious and Food Network for inspiration.
Preparing Bloody Red Velvet Cake
Creating a bloody red velvet cake is an enchanting adventure, perfect for impressing your friends and family (or maybe to give a delightful scare at your next Halloween gathering!). Let’s dive into the necessary steps for preparing this striking dessert from beginning to end.
Step 1: Prepare the "Glass" Shards
First things first, we’ll need to create those eye-catching candy glass shards that will enhance your cake's dramatic flair.
- Line a large baking sheet with parchment paper and set it aside.
- In a medium saucepan, combine 2 cups of granulated sugar, ⅔ cup of light corn syrup, ¾ cup of water, and ⅛ teaspoon of cream of tartar. Stir the mixture over medium-high heat until it reaches a boil.
- Once boiling, stop stirring, and wait until the candy thermometer reads 300ºF. This crucial step leads to a beautiful, hard candy!
- Carefully pour the mixture onto your prepared baking sheet. Spread it out for an even layer and allow it to harden for about 2 hours.
- Once solid, use a hammer to break it into shards—make sure to take care during this step!
Step 2: Make the Red Velvet Cake
Now for the centerpiece—the delectable layers of your bloody red velvet cake!
- Preheat your oven to 350°F and line four 6-inch round baking pans with parchment paper, then spray them lightly with nonstick cooking spray.
- Whisk together 1 ¾ cups of flour, 2 tablespoons of cocoa powder, 1 teaspoon of baking powder, ½ teaspoon of baking soda, and ½ teaspoon of salt in a mixing bowl. Set this aside.
- In your stand mixer, beat ¾ cup of softened butter with 1 cup of granulated sugar and 2 tablespoons of brown sugar until it’s pale and fluffy.
- Add in 2 eggs, followed by ¾ cup of sour cream, 1½ teaspoons of vanilla, and ½ teaspoon of vinegar. Mix until combined.
- Gradually add the dry ingredients and carefully fold in ½ cup of buttermilk mixed with 1 tablespoon of red food coloring.
- Pour the batter evenly into your prepared pans. Bake for 25-27 minutes, or until a toothpick comes out clean. Let the cakes cool before removing them from the pans.
Step 3: Whip Up the Buttercream
The dreamiest vanilla Swiss meringue buttercream will ensure your cake is as beautiful on the outside as it is on the inside!
- Combine 7 large egg whites, 2 ¼ cups of sugar, and ¼ teaspoon of salt in the stand mixer’s bowl. Put it over a pot of simmering water, whisking constantly until the sugar dissolves.
- Return the bowl to the stand mixer and beat on high speed until you achieve a fluffy texture. Slowly add in 1¾ cups of cold, sliced butter—this is the secret to that silky finish!
- Finally, mix in the vanilla and take a moment to admire your buttery creation!
Step 4: Create the Ganache
Let’s elevate the drama with a white chocolate ganache that resembles blood.
- Heat 3 ounces of chopped white chocolate and ¼ cup of heavy cream together in a microwave-safe bowl, stirring until smooth. Add in a few drops of red and black food coloring until you reach your desired hue.
- Allow this mixture to cool and thicken slightly while you prepare for assembly.
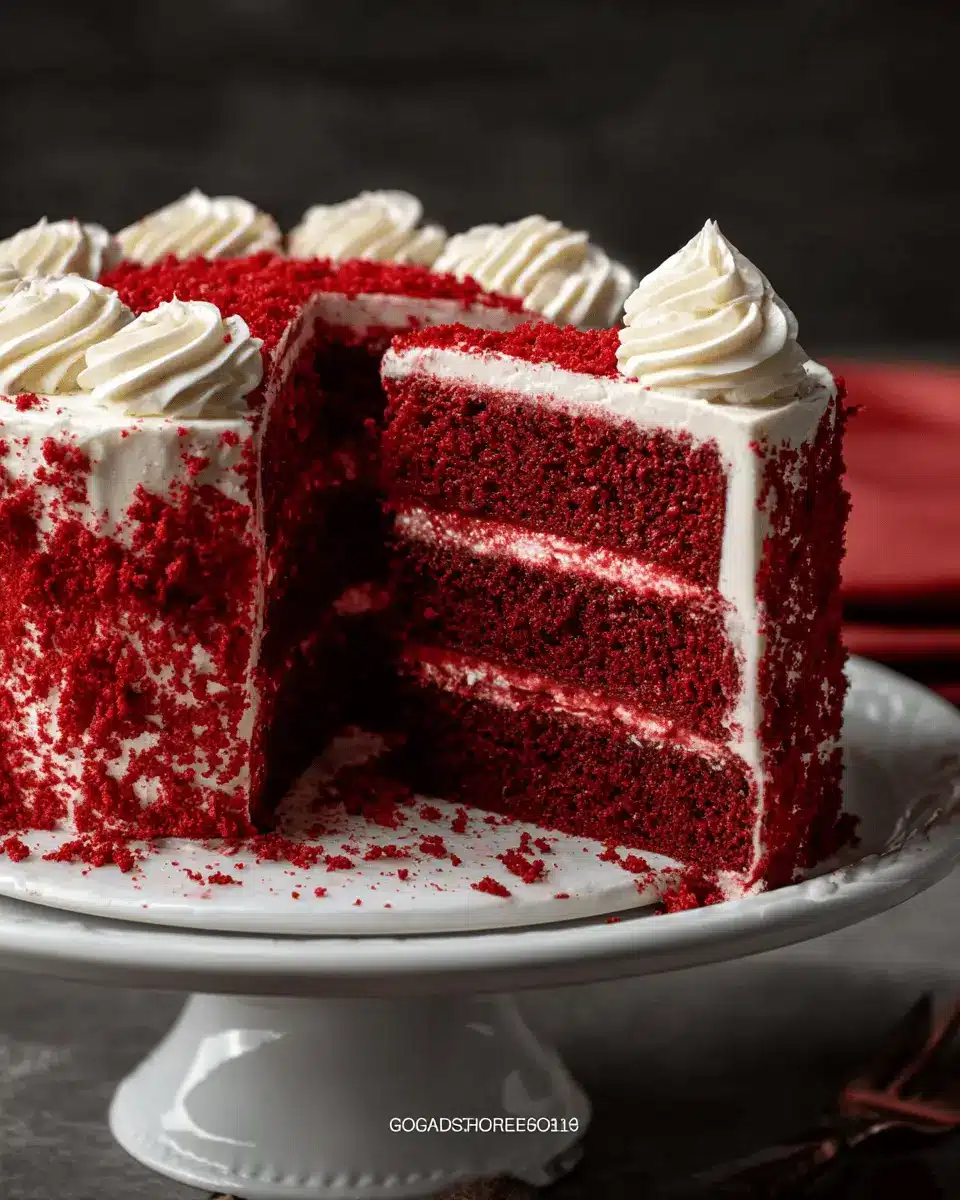
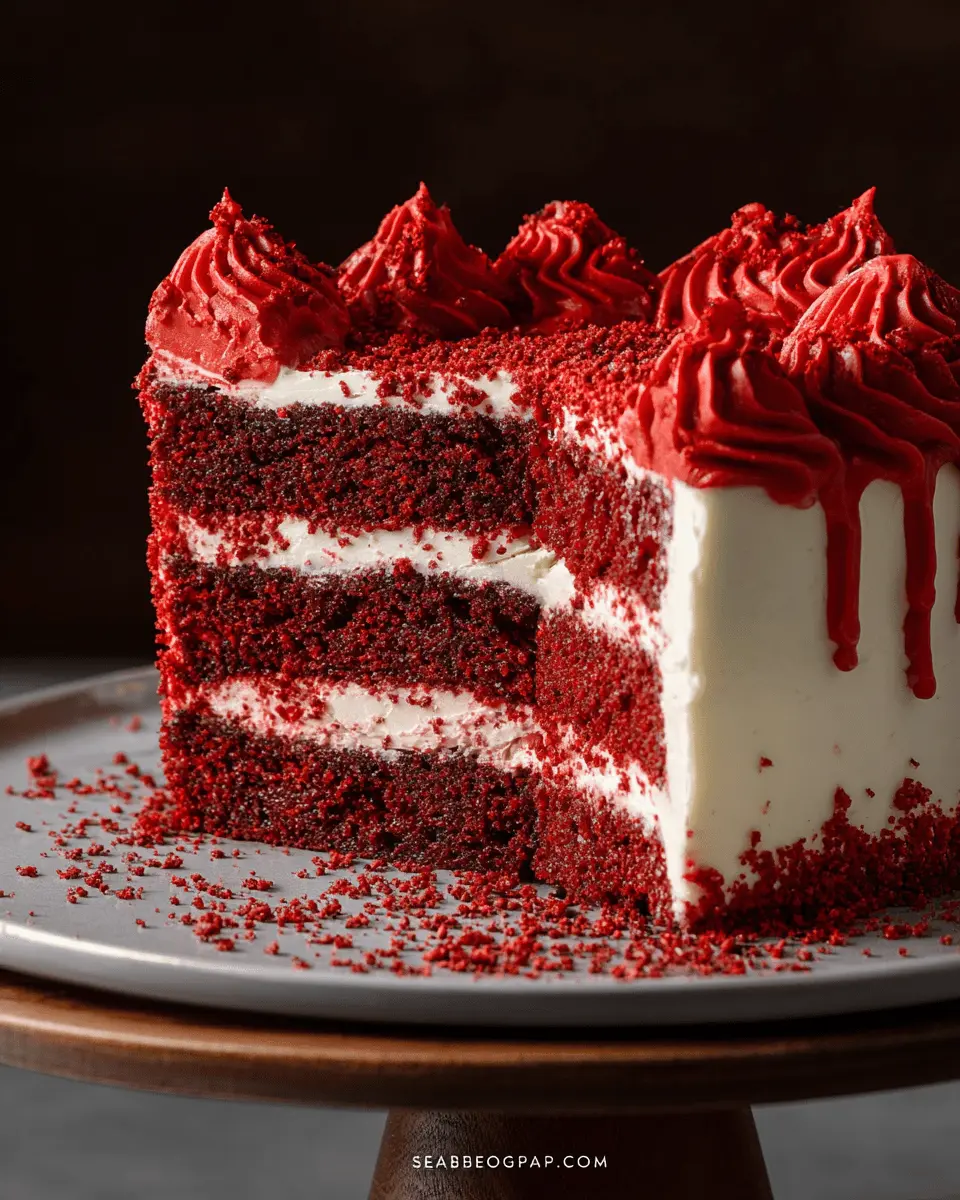
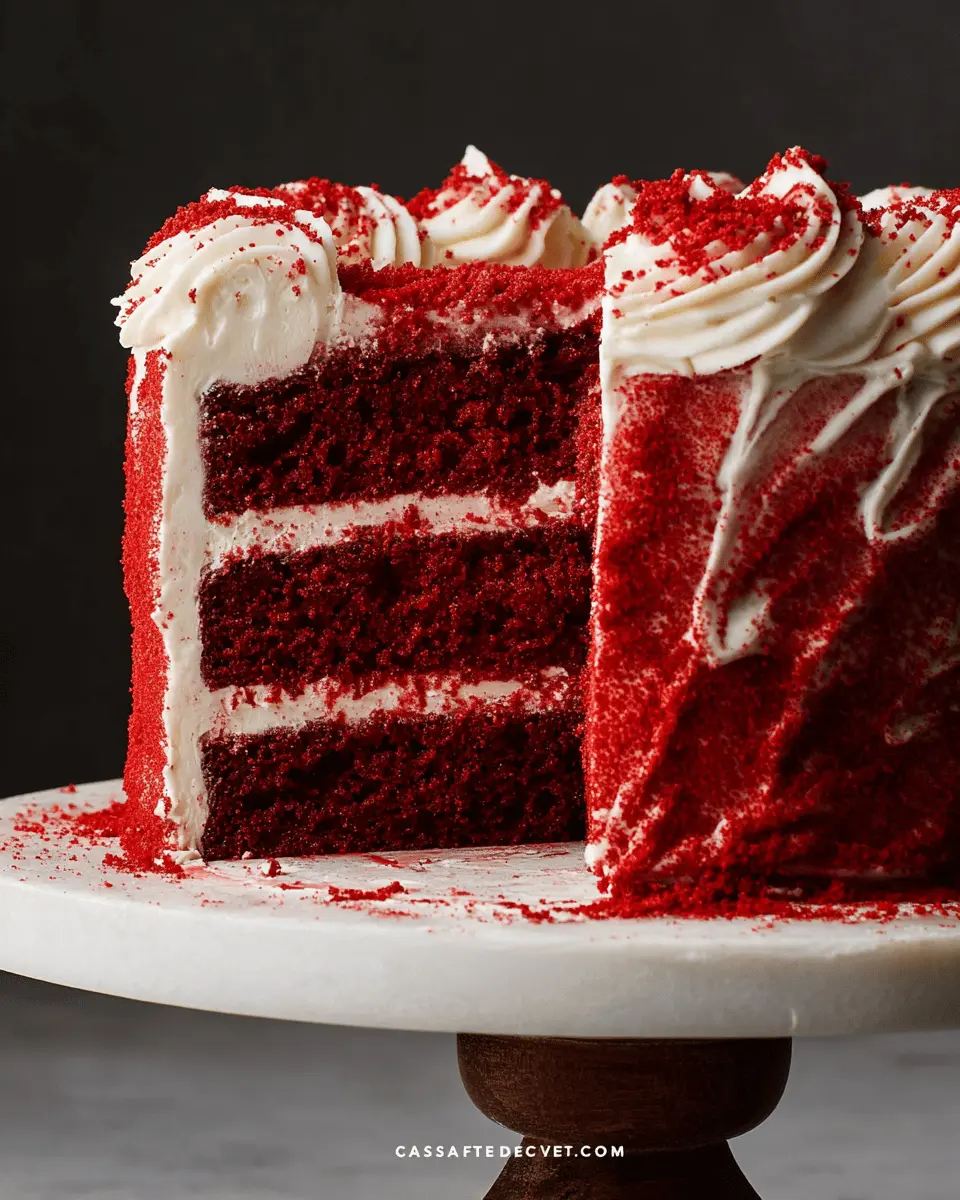
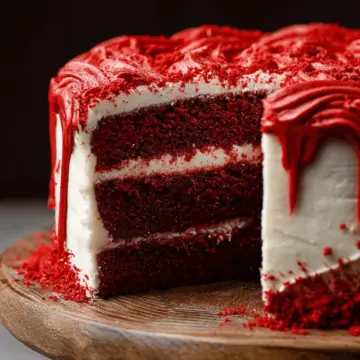
Step 5: Assemble the Cake
Now it’s time to bring all these elements together into a masterpiece!
- Start with a layer of cake on a serving plate, topping it with your buttercream and grating dark chocolate over the buttercream for that added touch.
- Repeat the layers until all four are stacked. Freeze it for about 30 minutes to stabilize the cake for easier frosting.
- Frost the entire cake with a crumb coat and freeze until set. Follow up with a thicker layer of frosting to conceal any cake peeking through.
- Pour the ganache around the top edges, allowing some to drip down the sides for a haunting appearance.
- Finally, insert your glass shards into the cake and drizzle with more ganache if you wish.
And there you have it—your bloody red velvet cake is ready to wow your guests! Enjoy every spooky bite!
Variations on Bloody Red Velvet Cake
Add Spooky Sprinkles
Elevate your bloody red velvet cake by incorporating some festive, spooky sprinkles! Choose colors like black, orange, or even glittery edible stars to give it a mesmerizing effect—perfect for Halloween gatherings. Sprinkling these on top before the ganache sets will create an eye-catching detail that guests will love. It’s a fun way to add texture and a festive feel!
Substitute the Red Velvet with Classic Chocolate
If you’re craving a twist, consider swapping out the red velvet cake with a rich, classic chocolate cake. This variation turns your spooky dessert into a chocolate lover’s dream while maintaining the dramatic presentation. Use the same frosting and ganache, and watch your guests delight in this new take on a classic! For ideas on other cake flavors, check out this great resource on cake variations for inspiration.
Baking Notes for Bloody Red Velvet Cake
Tips for Perfect "Glass" Shards
Creating those stunning candy glass shards is where the magic happens! To ensure they turn out perfectly, aim for a consistent temperature when boiling the sugar mixture. Use a candy thermometer to reach exactly 300°F for that ideal crunch. Don’t rush the cooling process — allowing the shards to set undisturbed for at least 2 hours will yield better results. When breaking them, cover with a kitchen towel to avoid any sugar splinters flying!
Troubleshooting the Buttercream
If your buttercream isn’t as smooth as you’d like for the bloody red velvet cake, don’t panic! A slightly curdled appearance is normal; just keep mixing until it becomes silky. If it seems too runny, refrigerate for 30 minutes before re-whipping. Curious about the science behind this? Check out this buttercream guide for tips from baking experts. Remember, patience is key to achieving that beautiful finish!
Serving Suggestions for Bloody Red Velvet Cake
Pairing with a Spiced Pumpkin Latte
The bloody red velvet cake creates a delightful contrast when paired with a warm Spiced Pumpkin Latte. The rich flavors of cinnamon and nutmeg in the latte complement the cake’s moist texture and subtle cocoa notes beautifully. Plus, the festive autumn vibe makes it a perfect treat for cozy gatherings. Consider whipping up this latte with your favorite coffee blend and adding just a touch of vanilla cream for an extra layer of flavor.
Presenting as a Halloween Showstopper
If you're looking to impress at your Halloween party, showcasing the bloody red velvet cake is sure to be a head-turner. Decorate with eerie candy glass shards, and drizzle the white chocolate "blood" ganache artistically over the top. Your guests will be captivated—not just by the spooky aesthetics but also by the rich, velvety flavors. Want to spice it up? Consider serving with themed desserts or Halloween-themed cocktails (non-alcoholic, of course) for a complete experience!
Tips for Making the Perfect Bloody Red Velvet Cake
Use Quality Ingredients
To achieve that rich, velvety texture and striking color, opt for high-quality ingredients. Fresh eggs, unsalted butter, and natural cocoa powder will boost the flavor of your bloody red velvet cake. Don’t skimp on the food coloring, either; a good gel version will ensure that vibrant red hue we all crave.
Don't Rush the Cooling Process
Patience is key! Once your cakes are out of the oven, let them cool for at least 10 minutes in the pan before transferring them to a wire rack. Allowing them to cool completely helps maintain moisture and prevents breaking. Trust me, your bloody red velvet cake will be much more delicious if you give it the time it needs!
Time Details for Bloody Red Velvet Cake
Preparation Time
Getting started on your bloody red velvet cake is a breeze! Set aside about 45 minutes for preparation. This includes gathering your ingredients, making candy shards, and preparing the cake batter.
Cooking Time
You'll spend approximately 30-35 minutes baking the cake once it's ready to go into the oven. Each cake layer needs time to rise and set to perfection.
Total Time
In total, expect around 2.5 to 3 hours from start to finish, including cooling and assembling. The end result? A stunning and delicious centerpiece that commands attention and tastes incredible!
Feeling inspired? Check out this guide on making perfect red velvet cake for additional tips!
Nutritional Information for Bloody Red Velvet Cake
Calories
A slice of bloody red velvet cake packs approximately 450 calories. If you're indulging in this eye-catching treat, it's good to enjoy it in moderation and possibly offset those calories with a healthy choice at your next meal.
Protein
This beautiful cake is also a source of protein, offering around 6 grams per slice. This comes mainly from the eggs and butter used in the recipe, making it a satisfying choice for those looking to balance their indulgence with a bit of nourishment.
Sugars
When it comes to sweetness, be prepared! Each slice contains about 40 grams of sugar. Most of this sweetness hails from the granulated sugar and other sweeteners in both the cake and frosting. It’s definitely a delightful treat, but consider pairing it with a cup of tea or coffee to balance that sweetness.
If you're curious about more nutritional insights, check out resources like the USDA’s FoodData Central for detailed macro and micronutrient information. Enjoy baking your bloody red velvet cake!
FAQs about Bloody Red Velvet Cake
Can I make this cake in advance?
Absolutely! The Bloody Red Velvet Cake can be made a day or two ahead of time. Just bake your layers, let them cool completely, and wrap them tightly in plastic wrap to keep them fresh. You can also prepare the buttercream and ganache in advance. Just store them in the fridge and re-whip when you're ready to assemble the cake!
What’s the best way to store leftover cake?
To keep your leftover bloody red velvet cake fresh, store it in an airtight container in the fridge. It should stay delicious for up to five days. If you want to keep it longer, consider freezing the cake. Wrap it securely in plastic and aluminum foil, and it can last for up to three months!
Can I use a different type of food coloring?
Definitely! While the recipe suggests a specific gel food coloring, you can use any type you prefer. Just remember that liquid food coloring may alter the cake’s texture, so adjust accordingly. Want a more natural coloring? Consider beet juice for a fun twist! For more tips on color alternatives, check out this article.
Conclusion on Bloody Red Velvet Cake
Creating a bloody red velvet cake is not only a feast for the stomach but also a delight for the eyes. With a mix of vibrant flavors and stunning presentation, this cake is perfect for Halloween parties or any celebration that embraces the spooky vibe. Enjoy every bite!
Bloody Red Velvet Cake: An Indulgent Homemade Delight
Equipment
- medium saucepan
- stand mixer
- mixing bowl
- baking sheets
- parchment paper
- toothpick
- cake plates
- Microwave-safe bowl
Ingredients
Candy "Glass" Shards
- 2 cups granulated sugar
- ⅔ cup light corn syrup
- ¾ cup water
- ⅛ teaspoon cream of tartar
Red Velvet Cake
- 1 ¾ cups all-purpose flour
- 2 Tablespoons natural cocoa powder
- 1 teaspoon baking powder
- ½ teaspoon baking soda
- ½ teaspoon salt
- ¾ cup unsalted butter, softened
- 1 cup granulated sugar
- 2 Tablespoons brown sugar
- ¾ cup sour cream
- 1 ½ teaspoons vanilla
- ½ teaspoon vinegar
- ½ cup buttermilk If no buttermilk, use milk with lemon juice or vinegar.
- 1 Tablespoon red food coloring Wilton's No Taste Red gel recommended.
Vanilla Swiss Meringue Buttercream
- 7 large egg whites
- 2 ¼ cups granulated sugar
- ¼ teaspoon salt
- 1 ¾ cups (3 ½ sticks) unsalted butter, cold and sliced into about 20 pieces
- 1 teaspoon vanilla
White Chocolate "Blood" Ganache
- 3 ounces white chocolate, chopped or chips
- ¼ cup heavy cream
- Red and black food coloring
For Assembly
- Grated dark chocolate
Instructions
Make the "Glass" Shards
- Line a large baking sheet with parchment paper; set aside.
- Combine all of the ingredients in a medium saucepan. Place pan on the stove over medium-high heat, and stir the mixture until it comes to a boil.
- Once it begins to boil, stop stirring and allow it to continue boiling. As soon as a candy thermometer reaches 300ºF, turn off the heat and immediately pour the candy liquid onto the baking sheet. Use a heat resistant spatula or a spoon, to spread the candy liquid out toward the edges and into an even sheet. Let sit and harden for 2 hours.
- Once the sheet of candy is completely solid, use a hammer to carefully break it up into pieces. Be careful during this step.
Make the Cake
- Preheat oven to 350ºF. Line four 6-inch round baking pans with parchment paper, and spray with nonstick cooking spray.
- In a mixing bowl, whisk together the flour, cocoa powder, baking powder, baking soda, and salt until combined; set aside.
- In the bowl of a stand mixer fitted with a paddle attachment, beat the butter and sugars together on medium speed until pale and fluffy. Beat in the eggs, one at a time, until combined, scraping down the sides and bottom of the bowl as needed. Beat in the sour cream, vanilla, and vinegar on medium speed.
- Pour the dry ingredients into the wet ingredients and mix until combined. Whisk the food coloring into the buttermilk, then pour it into the batter. Mix until just combined, scraping down the sides and bottom of the bowl as needed.
- Divide batter among the four cake pans. Bake for 25-27 minutes or until a toothpick inserted in the center comes out clean. Allow to cool in the pan for 10 minutes before transferring to a wire rack to cool completely.
Make the Buttercream
- Combine the egg whites, sugar and salt in the bowl of a stand mixer. Remove bowl from mixer and place over a simmering pot of water. Whisking constantly, heat mixture until sugar is dissolved and the temperature registers 150-160°F on a candy thermometer, about 3 minutes.
- Secure whisk attachment onto stand mixer, and beat the egg white mixture on high speed until cooled to room temperature and fluffy. Add the butter, one piece at a time, and continue beating until smooth and creamy. If the mixture looks curdled, that’s totally normal--just keep beating until it becomes smooth and satiny.
- Add the vanilla and continue beating for about 30 seconds.
Make the Ganache
- Place the white chocolate and heavy cream into a microwave-safe bowl. Heat in the microwave for 30 seconds, remove and stir until smooth. If you still see bits of unmelted chocolate throughout, heat for another 15-20 seconds.
- Stir in the red food coloring, followed by just a teensy tiny bit of black food coloring (if using). Allow ganache to cool and thicken slightly for about 30 minutes.
To Assemble
- Place a layer of cake onto a cake plate or pedestal. Top with a layer of buttercream, then use a cheese grater to grate a bar of dark chocolate evenly over the buttercream. Top with another layer of cake, and repeat steps until the top layer of cake is added. Place in the freezer for 30 minutes to stabilize cake for easier frosting.
- Once chilled and solid, frost the entire cake with a crumb coat, then return to the freezer until frosting has hardened. Add another layer of frosting, making sure that there is no cake peeking through the frosting.
- Starting with the sides, pour the ganache along the top perimeter of the cake. Once the sides are done, fill the center in with ganache.
- Take your "glass shards" and stick them into the center and sides of the cake. Pour more ganache onto the shards, if desired.
Leave a Reply