
Introduction to No-Bake Cannoli Pie
If you’re in the mood for a delightful dessert that doesn't require firing up the oven, no-bake cannoli pie is your ticket to sweet satisfaction. This irresistible treat combines the richness of traditional cannoli flavors with a simplified, no-bake approach, perfect for any occasion. Whether you're hosting a dinner party or just craving something sweet, this pie delivers a creamy, dreamy experience without the hassle.
Why Choose a No-Bake Dessert?
No-bake desserts are a time-saver and an excellent choice for warm weather when every degree counts. They’re typically quicker to prepare (this one just takes about 20 minutes of active time), allowing more spontaneous moments in the kitchen. Plus, without the need for baking, you can avoid the pitfalls of a hot kitchen and enjoy an indulgent dessert without stress.
This no-bake cannoli pie is an outstanding way to impress your guests with a deliciously nutty crust, creamy filling, and fresh citrus zest, all while keeping things effortless. You can easily customize it with your favorite toppings or incorporate some festive garnishes. Trust us, once you give this pie a try, it might just become your go-to dessert for every gathering! To learn more about the benefits of no-bake desserts, check out this article.
Ingredients for No-Bake Cannoli Pie
When you're ready to whip up this delightful no-bake cannoli pie, the ingredients can be broken down into two main categories: the crust and the filling.
Key Ingredients for the Crust
Creating the perfectly crunchy yet sweet crust is essential for elevating your no-bake cannoli pie experience. Gather the following:
- 8 waffle cones, slightly crushed for that signature cannoli shell flavor
- ½ cup roasted pistachios, adding a nice nutty crunch
- 1 tablespoon granulated sugar to balance the flavors
- 7 tablespoons unsalted butter, melted to bind it all together
- A light coating of cooking spray for a non-stick finish
For an extra tasty tip, consider using different flavored cones for a fun twist!
Essential Ingredients for the Filling
Next, let’s talk about what makes the filling so irresistible. Here’s what you’ll need:
- 1 ½ cups whole milk ricotta, for that classic creamy texture
- 1 cup mascarpone cheese, enhancing the richness
- 1 cup unsifted powdered sugar for sweetness
- ½ cup miniature semisweet chocolate chips, plus more for garnish
- 2 teaspoons grated orange zest, introducing a citrusy freshness
- 1 teaspoon vanilla extract for a hint of warmth
- 1 cup heavy whipping cream, which you’ll whip to perfection
- ¼ teaspoon kosher salt to balance everything out
With these ingredients on hand, you’re just moments away from a dessert that feels indulgent yet surprisingly simple to assemble. Happy baking!
Preparing No-Bake Cannoli Pie
This no-bake cannoli pie is a delightful twist on the classic Italian dessert, merging rich flavors with a simple preparation method. Ready to make your taste buds dance? Let's get started!
Step 1: Gather all ingredients
Before diving into the fun part, it's essential to have everything you need at your fingertips. Here’s what you’ll need for your no-bake cannoli pie:
-
For the Crust:
-
8 waffle cones, slightly crushed
-
½ cup roasted pistachios
-
1 tablespoon granulated sugar
-
7 tablespoons unsalted butter, melted
-
Cooking spray
-
For the Filling:
-
¼ cup salted roasted pistachios (more for garnish)
-
1 ½ cups whole milk ricotta
-
1 cup mascarpone cheese
-
1 cup unsifted powdered sugar
-
½ cup miniature semisweet chocolate chips (plus more for garnish)
-
2 teaspoons grated orange zest (more for garnish)
-
1 teaspoon vanilla extract
-
¼ teaspoon kosher salt
-
1 cup heavy whipping cream
Make sure all ingredients are fresh and ready for action!
Step 2: Prepare the crust
Creating the crust is your first step to flavor town. In a food processor, pulse the waffle cones, roasted pistachios, and sugar until finely ground—about 20 one-second pulses should do the trick. Next, add the melted butter and pulse until the mixture holds together when squeezed.
Lightly coat your 9-inch deep-dish pie plate with cooking spray before transferring the crust mixture. Press it evenly into the bottom and up the sides of the plate. For a solid base, freeze it uncovered for about 15 minutes. This provides the perfect crunch reminiscent of traditional cannoli shells.
Step 3: Make the filling
While the crust is chilling, it's time to whip up the delicious filling. Finely chop the remaining pistachios and mix them in a medium bowl with ricotta, mascarpone, powdered sugar, chocolate chips, orange zest, vanilla, and salt. Stir everything together until well combined and set aside.
Step 4: Combine whipped cream with ricotta mixture
Now for the magic touch! In a separate bowl, beat the heavy cream on medium-high speed until medium peaks form, usually taking 2 to 3 minutes. Gently fold about half of the whipped cream into the ricotta mixture until just combined. This creates an airy filling that will make your no-bake cannoli pie incredibly light and creamy.
Step 5: Assemble the pie
Spoon the ricotta mixture into your prepared crust, spreading it evenly with a rubber or offset spatula. Now’s a great time for a taste test—don't hesitate to sneak a spoonful!
Step 6: Let it set in the refrigerator
Cover your pie with plastic wrap and let it set in the refrigerator for at least 4 hours, or if you can resist, up to 8 hours. This will allow the flavors to meld beautifully and the filling to firm up properly.
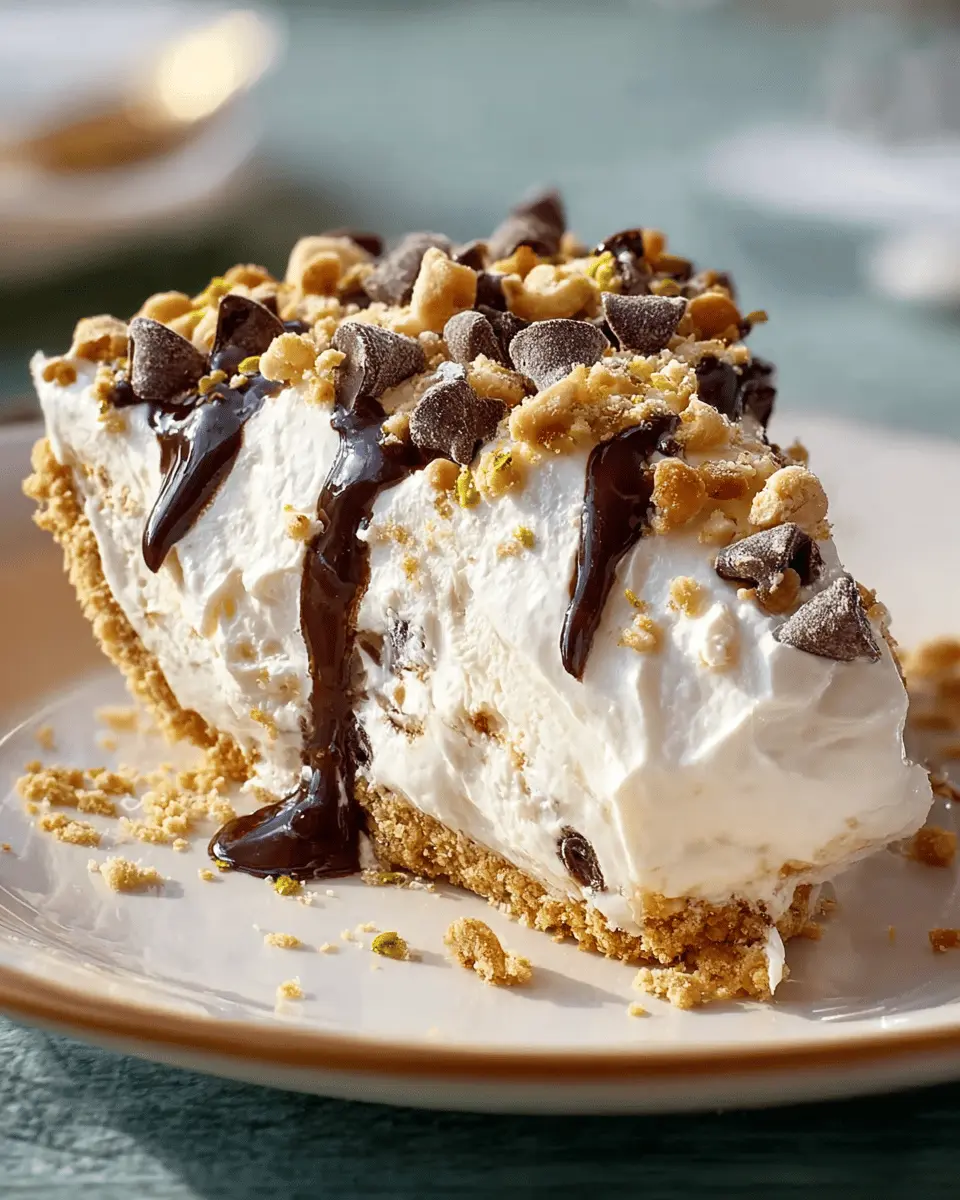
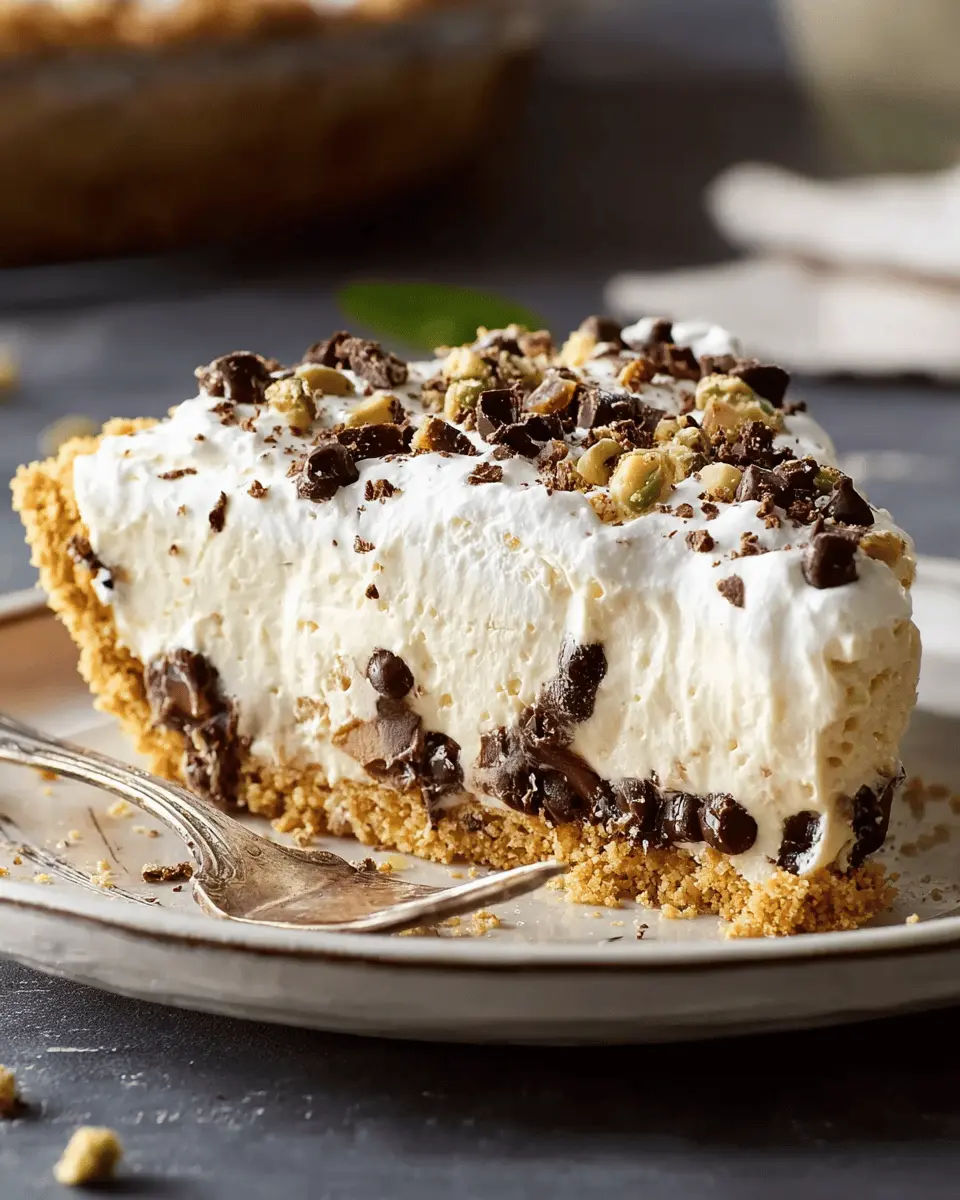
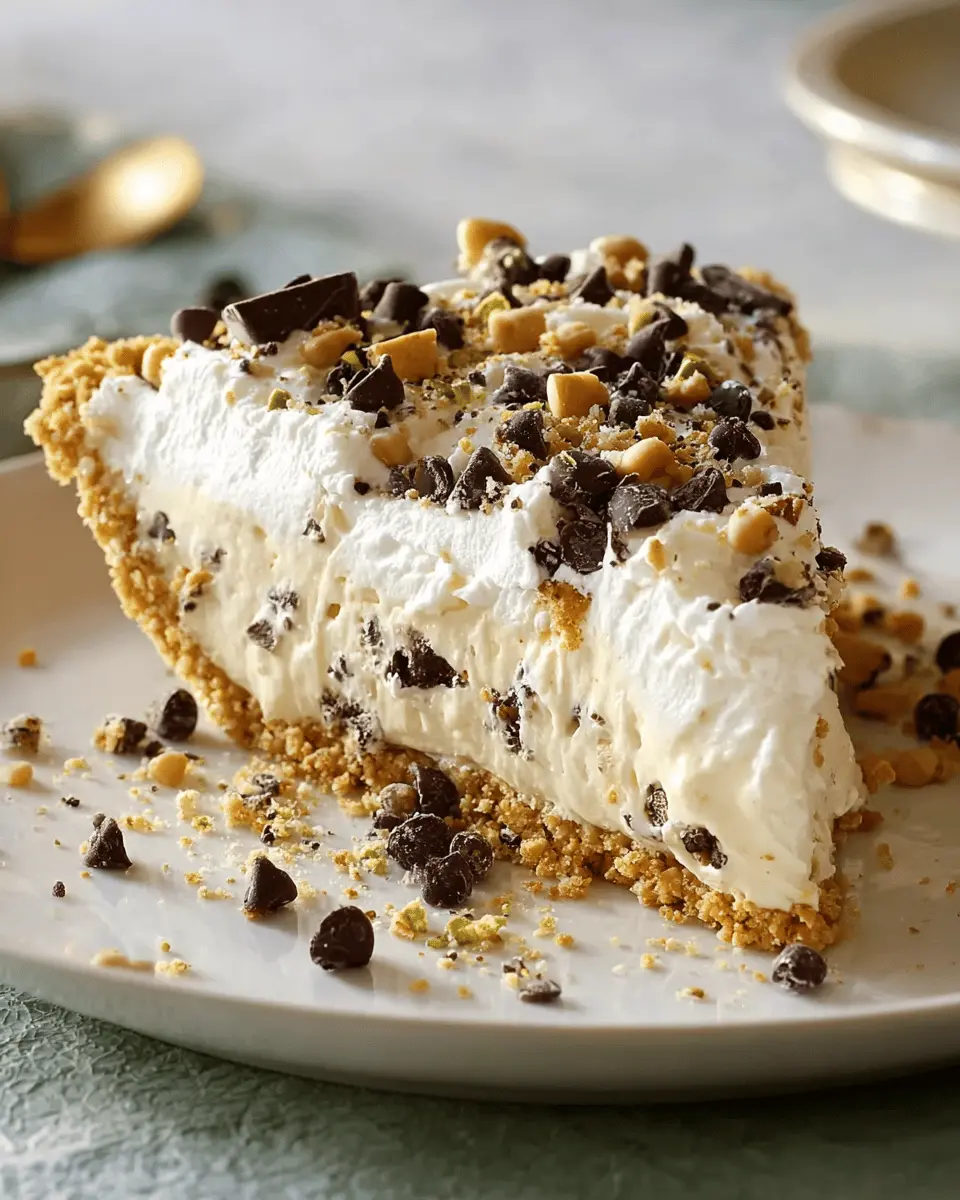
And there you have it! When you're ready to serve, garnish with chopped pistachios, chocolate chips, and a sprinkle of orange zest for that extra pizzazz. Enjoy your delicious no-bake cannoli pie—it's sure to be a hit!
Feeling inspired? Check out AllRecipes for more dessert ideas and tips!
Variations on No-Bake Cannoli Pie
Adding Different Nuts
Get creative with your no-bake cannoli pie by experimenting with different nuts! Instead of just roasted pistachios, try substituting them with crushed walnuts or hazelnuts for a unique twist. You could even toast the nuts beforehand to enhance their flavor. Another option is to sprinkle whole almonds on top for a delightful crunch. Just remember to adjust your garnish accordingly to maintain that beautiful presentation!
Exploring Alternative Fillings
While the classic filling in a no-bake cannoli pie is truly delectable, you can easily play around with flavors! Consider adding different extracts like almond or lemon for a zesty touch. If you’re feeling adventurous, swap in ricotta for a flavored cream cheese or add fruit purees, such as strawberry or blueberry, for a refreshing spin. Try incorporating some coconut flakes or even a dash of espresso powder for unexpected layers of flavor. The possibilities are endless! For more tips on flavor variations, check out sites like Epicurious or Food Network.
Cooking notes for No-Bake Cannoli Pie
Tips for achieving the perfect crust
To create a deliciously crunchy crust for your no-bake cannoli pie, ensure the waffle cones are finely crushed—this helps them hold together better. Mixing in roasted pistachios not only adds a flavorful twist but also enhances the texture. When pressing the crust into the pie plate, use a flat-bottomed glass to compact it evenly, ensuring no gaps. Freezing for about 15 minutes sets the crust perfectly before adding your filling.
Common pitfalls to avoid
A common mistake is not allowing the pie to set long enough in the refrigerator. Aim for at least 4 hours, or even better, overnight. This helps the filling solidify, giving you that iconic sliceability. Additionally, avoid over-mixing the ricotta and mascarpone mixture; gentle folding will keep your filling light and airy. Always taste your filling before you assemble—it’s a great way to ensure the balance of flavors is just right!
Serving suggestions for No-Bake Cannoli Pie
Ideal accompaniments
Elevate your no-bake cannoli pie experience by pairing it with fresh seasonal fruits, like berries or peaches. A dollop of whipped cream or a scoop of vanilla ice cream also complements the rich flavors beautifully. For a refreshing twist, serve with a side of zesty lemon sorbet. If you’re hosting, consider pairing it with a light herbal tea or a sparkling lemonade for a fun and vibrant touch. These bright flavors balance the sweetness of the pie, creating a delightful contrast.
Presentation tips
When it comes to presentation, striking visuals matter! Start by trimming the pie into neat slices, then arrange them on a colorful dessert plate. For added flair, sprinkle extra chopped pistachios, chocolate chips, and a hint of orange zest atop each slice. A fresh mint leaf can give a dash of color and aroma. Lastly, consider using decorative pie forks or plates to impress your guests and elevate the overall dining experience. Simple touches like these make your no-bake cannoli pie not just a dessert, but the star of the table.
Time details for No-Bake Cannoli Pie
Preparation time
This delightful no-bake cannoli pie comes together in just 20 minutes. It's a quick and enjoyable process that allows you to focus on gathering those amazing ingredients without feeling rushed.
Setting time
After the prep, you'll need to let your pie set in the fridge for at least 4 hours, though it can be left for up to 8 hours for optimal firmness and flavor.
Total time
In total, you’re looking at about 4 hours and 20 minutes from start to finish. This includes the time needed for both preparation and chilling, making it a perfect treat for your next gathering!
Ready to savor something sweet? Learn more about our ingredients like whole milk ricotta from Dairy Farmers of America for the best quality!
Nutritional Information for No-Bake Cannoli Pie
Calories per Slice
Indulging in a slice of this no-bake cannoli pie doesn’t just please your palate; it’s about 664 calories. With 10 servings per pie, it can be a delightful treat for gatherings or a sweet personal reward after a long week.
Sugars and Fats
When considering the sweet balance of flavors, be aware that each slice has around 27 grams of sugars, complemented by 50 grams of total fats. While enjoying your dessert, remember that moderation is key! If you're looking to cut back, consider sharing your pie or enjoying a smaller slice. For more insights on balanced snacking, check out resources from the American Heart Association.
FAQs about No-Bake Cannoli Pie
How can I make this pie in advance?
You can prepare your no-bake cannoli pie a day ahead of time! After constructing the pie, simply refrigerate it until you’re ready to serve. If you'd like to enjoy it later, freeze it for up to a month. Just make sure to wrap it tightly in plastic wrap to maintain its freshness.
What can I use instead of mascarpone?
If you can’t find mascarpone cheese, don’t worry! You can substitute it with a mix of cream cheese and heavy cream. Combine equal parts (e.g., ½ cup cream cheese with ½ cup heavy cream) and whip to a smooth consistency. This will give you a similar texture while maintaining the deliciously creamy filling.
Can I freeze the pie?
Yes! Freezing your no-bake cannoli pie is an excellent option. When ready to serve, remove the pie from the freezer and let it thaw in the refrigerator for several hours. Just be mindful that freezing may slightly alter the texture, but it’ll still be delicious! For more tips on freezing desserts, check out resources like Food Network.
Conclusion on No-Bake Cannoli Pie
In summary, this no-bake cannoli pie is the ultimate dessert to impress friends and family with minimal effort. Bursting with creamy ricotta, sweet chocolate, and a zesty kick, the pie offers a refreshing twist on a classic Italian treat. Give it a try, and watch everyone go back for seconds!
For more delicious inspirations, check out Allrecipes or Food Network for similar delightful desserts!

No-Bake Cannoli Pie
Equipment
- food processor
- Electric mixer
- measuring cups
- measuring spoons
- rubber spatula
- 9-inch deep-dish pie plate
Ingredients
Crust
- 8 pieces waffle cones slightly crushed
- ½ cup roasted pistachios
- 1 tablespoon granulated sugar
- 7 tablespoons unsalted butter melted
- cooking spray for greasing
Filling
- ¼ cup salted roasted pistachios plus chopped for garnish
- 1 ½ cups whole milk ricotta
- 1 cup mascarpone cheese
- 1 cup unsifted powdered sugar
- ½ cup miniature semisweet chocolate chips plus more for garnish
- 2 teaspoons grated orange zest plus more for garnish
- 1 teaspoon vanilla extract
- ¼ teaspoon kosher salt
- 1 cup heavy whipping cream
Instructions
Preparation
- Gather all ingredients.
- To make the crust: Pulse waffle cones, pistachios, and sugar in a food processor until mixture is finely ground, about 20 (1-second) pulses. Add butter, and pulse until mixture holds together when squeezed, about 10 (1-second) pulses, stopping to scrape down sides as needed.
- Lightly coat a 9-inch deep-dish pie plate with cooking spray, and transfer waffle cone mixture to prepared pie plate, pressing evenly into bottom and up sides of pie plate. Freeze crust, uncovered, until set, about 15 minutes.
- Meanwhile, to make the filling: Finely chop pistachios, and transfer to a medium bowl. Add ricotta, mascarpone, powdered sugar, chocolate chips, orange zest, vanilla, and salt. Stir until combined, and set aside at room temperature.
- Beat heavy cream with an electric mixer on medium-high speed until medium peaks form, 2 to 3 minutes. Spoon whipped cream into ricotta mixture, and gently fold until just combined.
- Spoon ricotta mixture into prepared crust, and spread in an even layer with a rubber spatula or offset spatula. Cover with plastic wrap, and refrigerate, uncovered, until set, at least 4 hours or up to 8 hours.
- Remove pie from refrigerator; remove plastic wrap, and garnish with additional chopped pistachios, chocolate chips, and orange zest.


Leave a Reply